This post contains affiliate links. We may earn a commission if you click on them and make a purchase. It’s at no extra cost to you and helps us run this site. Thanks for your support!
Let’s Embrace Imperfection in Digital Art with Pixelbuddha Studio’s Distorted Scanner Photo Effect Mockup.
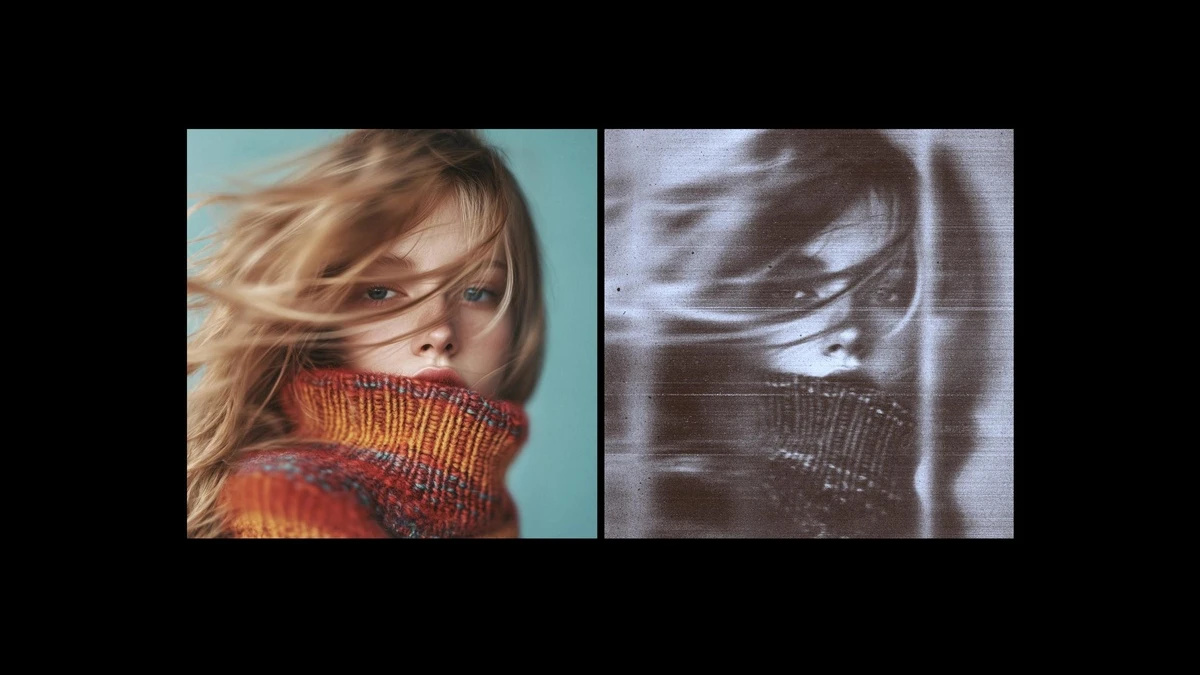
The digital world often chases perfection. We see crisp vectors and flawless high-resolution photography everywhere. Yet, a powerful counter-movement is gaining momentum. Creatives are actively seeking out aesthetics rooted in analog imperfection. This is where the distorted scanner photo effect finds its relevance. It taps into a growing desire for texture, grit, and emotional depth. This effect intentionally mimics the glitches, noise, and light leaks produced by a malfunctioning or misused flatbed scanner. It transforms pristine images into something far more evocative and mysterious. The result is a beautifully flawed image that feels both nostalgic and strikingly contemporary.
Please note that this mockup requires Adobe Photoshop. The latest version can be downloaded from the Adobe Creative Cloud website; simply visit this link.
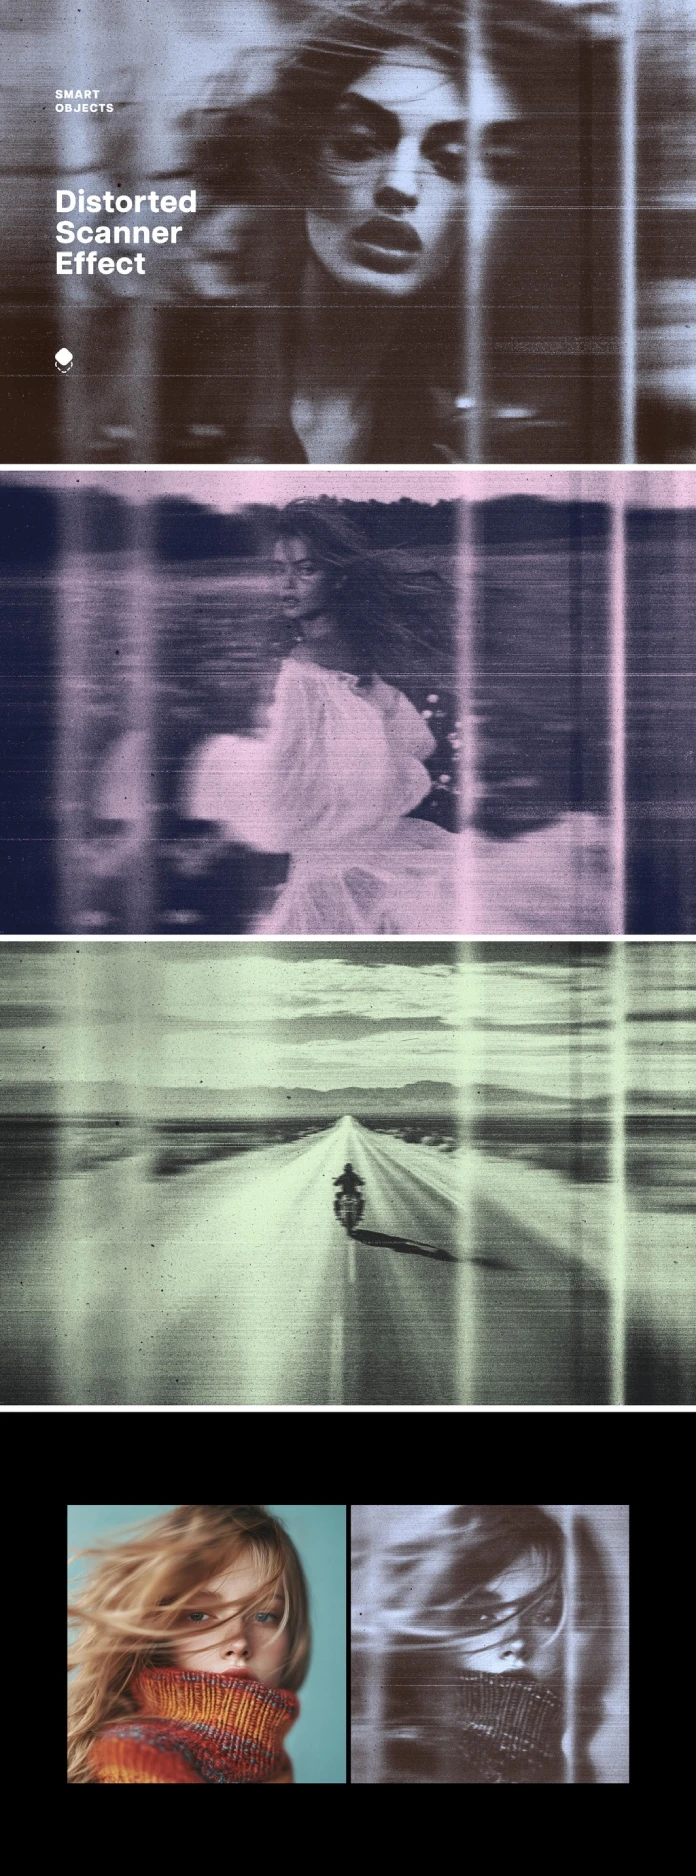
What Defines the Distorted Scanner Aesthetic?
The distorted scanner photo effect is more than just adding noise to an image. It is a specific kind of digital artifacting. Think about how an old scanner worked. The sensor would move across a document, line by line. If you moved the document during the scan, you would get strange stretching and blurring. If the lid wasn’t closed properly, light would leak in, creating bright vertical bands. These are the core elements of the look.
Key Visual Characteristics:
- Horizontal Scan Lines: Fine, consistent lines that run across the entire image, mimicking the path of the scanner’s sensor.
- Vertical Light Streaks: Bright, often overexposed, vertical bars that suggest light contamination during the scanning process.
- Motion Blur & Distortion: Areas of the image appear dragged, stretched, or warped, as if the subject was moved during the scan.
- Grain and Noise: A layer of digital noise or film grain adds a tactile, vintage quality to the final image.
- Desaturated & Shifted Colors: The color palette often becomes muted or tinged with a specific hue, like the purplish or greenish tints seen in the examples.
This aesthetic is not about random chaos. It is a controlled deconstruction of an image. The beauty lies in how these “errors” interact with the original photograph. They can obscure a face, adding mystery. They can blur a landscape, creating a dreamlike quality. Why has this look become so popular?
The Appeal of Analog Glitches in a Digital Age
Perfection can feel sterile. The distorted scanner photo effect offers an antidote to the hyper-clean look dominating social media feeds. It introduces a human element—the suggestion of a physical process, complete with potential mistakes. This resonates deeply with our nostalgia for a time before everything was digital. It recalls photocopied zines, old family photos, and the experimental art of the early digital era.
This effect allows artists and designers to inject a specific mood into their work. Do you want to create a sense of unease or mystery? The distortion can obscure details and create tension. Are you aiming for a dreamy, ethereal feel? The soft blur and light leaks can evoke a sense of memory or otherworldliness. It’s a powerful tool for visual storytelling. It pushes back against the idea that an image must be perfectly clear to be impactful. Sometimes, what is hidden or suggested is more powerful than what is explicitly shown.
How to Achieve the Distorted Scanner Photo Effect
While one could experiment with a physical scanner, this process is unpredictable and time-consuming. A far more efficient and controllable method is using a dedicated mockup. This is where tools like the distorted scanner effect mockup from Pixelbuddha Studio become invaluable for any creative working in Adobe Photoshop.
Using the Pixelbuddha Mockup in Photoshop
This high-resolution mockup (4500 x 3000 pixels) simplifies the entire process down to a few clicks. It utilizes Photoshop’s Smart Objects feature. Here’s a simple breakdown of how it works:
- Open the PSD file: You will find a well-organized layer structure.
- Locate the Smart Object Layer: This layer is typically labeled something like “Your Image Here” or “Replace Me.”
- Double-click the Smart Object: This will open a new Photoshop window containing the placeholder image.
- Place Your Image: Drag and drop your own photograph or design into this new window. You can resize and position it as needed.
- Save and Close: Simply save the Smart Object file (Ctrl+S or Cmd+S) and close the window.
- Witness the Transformation: When you return to the main PSD file, your image will have been automatically transformed with the intricate distorted scanner effects.
The power of this workflow is its non-destructive nature. Your original image remains untouched. You can easily swap in different photos to see how they look with the effect. You can also dive into the mockup’s layers to tweak the intensity of the grain, adjust the colors, or modify the light streaks to better suit your artistic vision. This level of control is what separates a professional tool from a simple filter. It offers a starting point for experimentation, not just a final, unchangeable look. It’s an accessible way to create a retro-futuristic photo effect without complex steps.
Check out other amazing design templates here at WE AND THE COLOR.
Subscribe to our newsletter!

